CLICK HERE FOR FREE BLOG LAYOUTS, LINK BUTTONS AND MORE! »
Showing posts with label sewing. Show all posts

Monday, August 13, 2012

Tangled Inspired dress

Our Disney World vacation is fast approaching. I have been trying to finish all of my projects and shopping for it...you would think that having planned this since March I would be a little more prepared. Not the case, my friends.

I was very proud of myself for finishing my daughter's 'princess' dress for our trip last week. I wanted her to have something special and princess themed for when we have breakfast with the princesses.  I didn't really want her to wear a dress up dress or anything that looked like one of the princess dresses. I figured there would be plenty of those there and I wanted her to stand out :)

I got the idea from etsy. I go there for inspiration and figure out how to make it myself for much cheapper. I found a sundress with appliques on it and made my own version. I found pictures on Google of the sun and Pascal and free handed the tower myself.
I made the dress in a pillowcase fashion for my own sanity. I am not crazy about them but I knew how easy they were. So I did it. Except I used a flat sheet. I found it for $2.99 at Salvation army and now I have plenty of fabric left for yet another Tangled idea I have for her. I used pieces of scrap out of my stash for the rest. It's all Steam a Seam on there and then hand stitched in place.  I also used the top of the flat sheet, you know where you would fold it down on the bed, for the bottom of the dress so it already had a hem and I didn't have to sew it myself.


I know it looks homemade and very amatuer but I'm happy with it. But, the best part is so is she!

Monday, June 11, 2012

Ready to meet Minnie Mouse!

Well, we don't leave for our Disney vacation for another two months but I am so happy to be knocking out some of the Disney projects I wanted to make for our adventure.

I just finished this one this morning. I started it yesterday while my mom was here-she brought my two nieces to play and told me to do whatever I wanted while she watched the kids. Yay craft time!!!

This is a semi-homemade outfit that I made out of a white t-shirt ($3 at Target) and a pair of black shorts ($2.44 at Wal-Mart). I also bought fabric at Hobby Lobby when it was on sale for $4 and used half a yard.

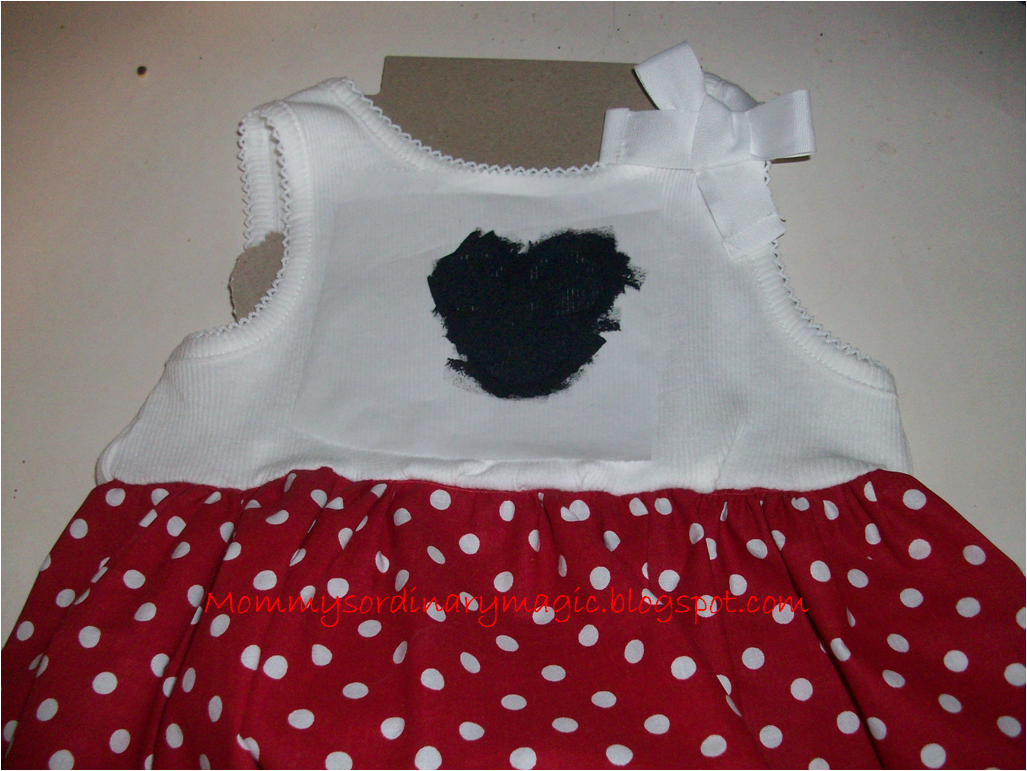
I cut a 8" x 36" piece of fabric for the bottome of my shirt. Oh yeah, I cut the bottom of the shirt off about an inch and a half below the armhole. Back to the red fabric...I ironed about 1/2 inch of one long side down for my hem and then sewed it. I sewed the two short ends together-wrong sides facing-to make a big loop. I then basted along the top and pulled my thread to get it to gather. Once that was done I attached it to the bottom of my shirt.

Let me try to walk you through this is case you are really bad at picturing in your head how to make things come out the right way....

I laid my shirt down, right side out. I turned my gathered red fabric 'inside out' so the wrong side was facing me. I then put it around the bottom of my shirt so the gathered end was against the bottom (now cut-off) end of my shirt. The hem of the red fabric was pointing toward the collar of the shirt. Still with me??? I pinned them together and carefully sewed.

Make sure you aren't so excited to be getting so much done and so well that you forget a step here. Make sure that the side seam of your red fabric meets up with the side seam of your shirt. :) Otherwise you will have a seam running down the front of your shirt. Thank goodness my mom was here and offered to rip the stitches out for me so I could do it again. Rookie mistake that I learned long ago and have no idea where my head was yesterday!

After that was in place and incredibly cute I decided to try something I had never done before. A freezer paper stencil. From some of the posts I have read about them, people seem to make these sound so difficult. I was scared for nothing.

I took a small piece of freezer paper and using a bottle of acrylic paint for the head and a quarter for the ears I traced a Mickey Mouse silhouette. I cut out my stencil from the freezer paper and with the waxy side down I ironed it to my shirt. I blotted some paint on there and easy peasy....not scary at all.

After the paint was dry I peeled the paper off and was so very happy :) Isn't that white bow the shirt came with just adorable?


I used the same concept of adding the red fabric to the shorts. Except the fabric was 18" x 4" for each leg hole.  I made a bow out of ribbon that I had leftover from our Minnie Mouse birthday party and hand sewed it to the shirt. i topped it with the ears I made her for the same party and she was so excited to try it on. The only problem I had was chasing her around the (messy) house to try and snap a picture! I can't wait for our dinner with Mickey and Minnie!


Tuesday, May 29, 2012

Winnie the Pooh T-shirt

My family is taking a vacation this year.

A very big vacation. A very special vacation.

Some people may think I'm crazy for taking a 2 year old and an infant to visit Mickey Mouse but we are all super excited!

And, we got a great deal when I booked back in March. Yep, March. So, I have LOTS of time to plan things and create fun stuff for our trip.

We'll be driving down at the end of August with my parents in tow. So, I will have plenty of posts in the coming weeks before our trip and even after with my tips, tricks and ideas for an awesome Disney vacation.

I completed my first real 'Disney Vacation' project last week. I want to make my daughter a lot of her clothes for the trip-while also stocking up on a bunch of Disney character garb at mom2mom sales-OMG I have a ton! I am not talking about making a princess dress though. That talented I'm not. My favorite character growing up was Winnie the Pooh. I was obsessed. So, I wanted to be sure along with Minnie and the princesses, Poohbear would be in her wardrobe for the week too.

I found this Disney shirt on Pinterest and it's from Honeybee Vintage.
I had a different idea in mind for a princess inspired piece so I took this idea and turned it into my own Winnie the Pooh creation.
I simply found a picture of Poohbear that was a side shot and traced it onto my paper. I went through my fabric scraps and found some yellow cotton fabric and red felt. I used ironed some heat n' bond to the back of each and then cut out each Pooh bear shape. After attaching it to the shirt I hand stitched around it with some yellow embroidery thread since I wasn't sure I would be able to do all the curves with my machine. I found a pack of honeybee buttons at Jo-Ann's and they were the final touch. My little girl loves the buttons and makes the zzzzzzzzzzzzzz sound while she plays with them :)

There you have a very cute and extremely inexpensive Disney shirt for a fun vacation memory. And, now I don't have to spend an arm and a leg at the park or the Disney store to get her something to wear!


Garanimals shirt from Walmart: $3.88
Honeybee buttons from Jo-Ann's: $1.99
(but I used a coupon too so they were cheaper!)
everything else I had on hand!


And, she loves it!

Monday, April 16, 2012

Dinosaur Tail

I gave birth to a little girl over two years ago. When they said: "It's a girl!" I immediately began dreaming and looking forward to dresses and cute shoes and tea parties and hair bows and all those girly things. I do have tea parties but while my girl wears outfits like a t-shirt and her pull-up with her snow boots :) And, forget about hair bows. They don't last five minutes in her hair usually and that is only when she lets me brush her hair without screaming thorugh it. I spend most of my days chasing her around trying to get her ponytail holder and bow back in her hair.

A few months ago was when she showed some real interest in two new things.

Dinosaurs and Pirates.

She still shouts 'argh, mateys!' whenever she sees even a picture of a pirate. And if she sees a dinosaur she puts her hands out like claws and begins to roooooooaaaarrrr! and chomp her teeth. While my husband was out of the country for a while back in February I decided to make her a real dinosaur. Plus, it kept me from going crazy and gave me something to do :)

I found the super easy instructions here after finding them on Pinterest.  I put it on her that morning and she had a BALL!! She thought this was the greatest thing ever. My pictures are not the best because I couldn't get her to stand still long enough to take a good one! She also really liked helping me stuff it :)

All in all the supplies cost me about $8 and I bought 2 remnants and had a lot left over. GREAT project and so super simple to follow and understand!


Monday, December 12, 2011

My Christmas mantle

Growing up we didn't have a fireplace in our house. But, we never wondered how Santa got in either so my parents never had to worry about answering that question!

For most of my life we just each hung our Christmas stocking in our bedroom. When I was in college my mom found a stocking hanger that had five hooks on it-exactly the number in our family at the time-that you hung on the wall and we finally had a 'place' for our stockings.

When I married my husband I was very excited that his house had a fireplace. It was a beautiful brick fireplace, albeit gas and in the basement but I was happy nonetheless.

We had the standard red/white store bought stockings for the loooooongest time growing up. As we got older we were all gifted with special stockings at one point or another and they still hang in my parents house every year along with new ones for our spouses and children. Yes, Santa fills our stockings there too :)

I was very excited to start a new tradition in my own little family for our daughter's first Christmas. I made a stocking for each of us and next year the new baby will have their own too!


I simply used a store bought stocking and made my pattern out of newspaper by tracing the stocking. These are two layers and we each chose the fabric for our stockings. Well, my husband and I picked out the little princesses but I am sure she'll love it! The inside of the stocking is lined with one fabric and it matches the letter (attached via heat n' bond) on the outside of the stocking and the hanger. Easy peasy and hopefully they will be treasured for years to come.

Sunday, April 10, 2011

Frilly Apron

My BFF's bridal shower was this past Saturday. I ended up buying her the bakeware she registered for. I have the same exact set and it comes packaged in the plastic cake carrier as a plus. I also bought enough fun sprinkles and pretty cupcake wrappers to fill a shoebox. I know she loves to bake and get creative with it so I figured it was a perfect gift. I really like to either make gifts or at least make a part of them myself. With this gift I figured an apron would be perfect. I wanted it to be really girly. I had seen some retro looking ones that were very feminine looking and fun but were a lot of $$$ for something you wear with the purpose of gettng it dirty. I had all of the material leftover from other projects so this didn't even cost me anything. I don't know how long it took me either since I worked on it here and there for a few days.

I made it all by guessing too! I didn't use a pattern but rather made my own. I measured and cut pieces out of newspaper to see how they would look on a person and with each other then trimmed or added on. My BFF is very petite. I mean super skinny and shorter than me...I'm 5'4". If she weighs 100 pounds soaking wet I would be surprised! So, I was able to make this one to fit her frame better.

I used velcro on the neck strap so she has a lot of room to adjust. The ruffles are just 3 inch scraps that I ironed in half and then sewed a straightstich down the middle. I carefully ruffled them by pulling the end threads and then attached them to the top. I did this step last.
She seemed to get a kick out of it and even tried it on at the shower after she opened it. I of course forgot my camera so there are no pictures of it on a person and these are the best I could come up with before I wrapped it!

Sunday, April 3, 2011

Dresses for Little Girls :)

I found this tutorial a while ago and saved it and couldn't wait for the time and occasion to make it. My sister asked me to make two coordinating dresses for my nieces so they could wear them for their pictures this summer. They wore them for a birthday party today and NOONE could believe I made them. Even my brother said 'wow!'. I also had to make an Easter themed one for Miss C :) She won't wear it on Easter Sunday but we have plenty of other times for her to wear it. Like today! I followed these simple instructions that I found on Punkin Patterns. They were SO easy and took very little time. And, they came out exactly how I envisioned them in my head...that rarely happens! I didn't add anything to the shirts for my nieces since they were already embellished but I did for my daughter's. I just used heat n'bond and some scrap fabric. I google searched "peep bunnies" and got a picture to trace and cut it out. Here they are in all their beautiful-ness!

This is Miss C 'hanging with her Peeps'...this is the best shot. Photographing a one year old is tough!
 These are the ones for my nieces. I used about 1 1/2 yards for each of the skirts. I wanted to be sure my overly tall niece would be able to wear hers all summer.
 I HAD to make them bows to match the dresses with some of the leftover material. I originally found the bow on Fabric Bows and More but the tutorial is from Craft Snob. These really completed the look and my nieces love wearing my bows in their hair :)

Monday, March 28, 2011

A baby for my baby brother

My little brother is going to be a father in a few weeks. I find this hard to believe since I have always thought of him as my 'baby' brother....he is only four years younger than me but he always had three mothers with our own mom and my sister and I jumping in as well :) The three of us hosted a shower for him and his wife this past weekend and they seem to be close to ready in terms of baby gear now. When I started thinking about their gift I had NO idea what to give them. I decided upon buying them the diaper bag they wanted and then filling it with goodies. I also decided to make all the goodies myself and they were so pleased with them and everyone at the shower seemed impressed when my sister told them that I made everything.

Their diaper bag is amazing. I know this because I have the same one. For about a week we had to make sure that this thing was out of the way while I was working on it. More than once my husband went to go grab this one on the way out the door...would not have been a good thing :) I made them the two NUK tethers by simply sewing some ribbon onto a suspender clip and then sewing velcro on the other end. I figured out how to do this after losing yet another $5 pacifier tether that we had bought. Much cheaper to do it on my own and I can choose my own design as well.

I made the sippy cup leash by following a tutorial on Make It and Love It. I really did like how this turned out and it was super easy!

 Next, I bought a three pack of good quality onesies from Carter's. I spent about $10 on the set but I wanted them to be nice and thick and I wanted at least one pink one :) Plus, these already had the little bow attached at the collar so I wouldn't have to add anything. I used Velveteen fabric paint after seeing it used for a different project online. I found three different sized round items (pen end, end of a dowel and the end of a foam paint brush) dipped them in the paint and then dotted them on the onesie to make different size and patterned necklaces. It became 'velvet' by simply holding my iron, on the steam setting, about an inch above it. I really like the added texture and dimension it gave them in the end.
 This is a little diaper clutch for a few diapers and wipes to go in and they can grab it out of the bag and go if they don't want to carry the whole bag with them to the bathroom when they are out. I added the handle and used some old fabric I had leftover from something else so I didn't really have to spend on this one :) I used the tutorial I found on Lemon Squeezy Home. Hers looks much better but I was ok with mine and think I may try it again for a friend who is currently expecting. Once again, this was so easy to follow and complete. I love when that happens :)

 I made these bibs by tracing one of my daughters bibs!  I used one of her smaller bibs from early on in life and traced it on some newspaper. I then made sure to cut around the outer edge of the line to be sure to make it big enough and to provide for my seam allowance. The front is flannel and the backs are terrycloth. I used velcro instead of snaps or buttons because that is what I prefer in a bib clasp. And, it is also the easiest for me to do.
 I made these matching burpcloths to go with them. Again, flannel on the front, terrycloth on the back. I cut them I think at 7x14. I sewed them twice, once with right sides together and then again once I flipped them and they were wrong sides together. I like how finished it makes it look.
 I also made burb cloths this way. I found this tutorial at Create Studio and bookmarked it a long time ago. It wasn't as easy I thought it looked but I am not a veteran sewer and have never taken a class on it either. My mom taught me a little bit and then I have been teaching myself how to do more than sew a hem :) In the end I didn't add ribbon to them all and I still think they looked good. I used the same three flannel fabrics and added two more plain cotton ones since I had five diaper burp cloths to use.
I loved being able to gift them homemade items and I think they were happy to get them. Now, I can hardly wait to meet my newest niece!