CLICK HERE FOR FREE BLOG LAYOUTS, LINK BUTTONS AND MORE! »
Showing posts with label Halloween. Show all posts

Monday, October 22, 2012

Every pirate needs a parrot

I was so excited for Halloween this year. For my kids, of course. I began thinking of costume ideas last year-when I was still pregnant. I always thought it would be cute to do some type of 'group' costume with my kids. They are so going to appreciate it when they are teenagers and look back on these pictures! :)

But, I couldn't come up with an idea that seemed 'perfect'. Then I found a cute lion costume for my son at a mom2mom sale for $5. It is one of those full bodysuits with the hood/head. Very warm and cozy, so I bought it.

Then I found the absolute perfect costume for my daughter and she really wanted it. It was a boys costume but it was in great shape and was a high quality costume. For $5 (yet again) at a garage sale. I was content with the idea of them each being their own 'thing' when an idea hit me. And, I got to work.

I bought a red hoodie and some sweatpants at Wal-Mart for my son. Hoodie was $6 and pants were $3. I used a 20% off coupon for all of my felt at Jo-Ann's so that saved me some big money too. I went ahead and bought 1/2 yard of each color since I figured I would be able to use leftover anyways. I made sure to buy it when it was $1.99 a yard too!

I started doing this a different way but scrapped that once I tried to assemble it all. It would not work out so I won't even show you any of those pictures. I moved on to this idea after some tears and a lot of thinking....


I used a brown paper bag to make my pattern. I simply measured the sweatshirt from the top shoulder seam to the bottom of the sleeved-before the cuff. Mine was 11 inches and I made it 12 just in case. I drew a twelve inch triangle on the bag and then added my scalloped sections and figured out where each color would be:
 I then cut apart the whole pattern. First the whole triangle and then each section. I cut each colored piece out individually. After the green top piece I made sure to trim a little bit off of each side of the remaining ones to ensure it would fit in between the pieces above it. Starting with the green top I cut TWO pieces of each section except the bottom red one-I only needed one of those. Using my glue gun I glued the top of each piece together but left the bottoms separated for now...
 I then added the next section, sandwiching them between the one above it. I continued this method for all of the sections-gluing the last one red piece between the pieces before it.
 Once each wing was complete and dry I just glued them to the top shoulder seam about a 1/2 inch away from the hood seam. I also added a tiny bit of glue in the middle of the wing and then glued it down at the wrist really well.
 I cut a big oval out of white for the belly and cut it in half. I carefully glued it as close to the zipper as I could get so it still looked like one piece.
 I 'freehanded' the tail pieces. I cut three shapes out of red and then layered the other colors on top of them. I didn't do them uniform or from a pattern because I wanted a bit more of a feathered look. I glued them all together and then glued them to the bottom of the back of the hoodie.
 I wanted a really cool beak but by the time I got around to that part I was feeling tired and worn out so I went for simple.  A yellow triangle glued to the rim of the hood. Add some white and black circles to the hood for eyes and we were set.
 
 
Aren't they the cutest, I mean meanest looking pirate and her parrot?! :) I can't wait for Halloween!


I'm up for the challenge!
Visit thecsiproject.com
 
YAY!!
Photobucket

Monday, October 15, 2012

Homemade Treat Bag

For my daughters very first Halloween she was 9 months old. That year I made her her very own Halloween treat bag and we've used it every year. Well, my husband is the one to carry it really. She carries a smaller pail and he empties that  out after a few houses so it isn't too heavy.

And, because I do for one child, I will always do for the rest. It's a middle child syndrome kind of thing. If you aren't a middle child I doubt you'd understand it. If you've never wondered why you were the only child in the family NOT named after a family member you'd never understand. My parents set me up for this complex :) They really did love me and still do-even when I complain about being the middle child.

My son will celebrate his first Halloween this year and he will be 10 months old. ,And because he is the only boy in my family (one sister and three girl cousins) I wanted to do something very boy-ish. After thinking it over and over and over I decided I wanted to use bats somewhere in the project. And, I was going to paint it on there with a freezer paper stencil. This was only my second attempt and thankfully my second success. I don't have a cartridge for my cricut with bats on it so I cut this out by hand. MY hand. With just an exacto knife. Grrrrr.

You can see near the top peak on each side of the "M" where my cutting got a little skewed. Those aren't supposed to be blobs. They are supposed to look like bones. The font is one I found for free online weeks ago. It's called 'bikerbones'. I thought it looked and sounded masculine enough.

I used simple black craft paint and left some spots not completely darkened to give it a worn, edgy kind of look. Did it work?? Do you see it? I of course gave it a quick shot of the hot iron to set it and hopefully it's now permanent.

I added some halloween ribbons and fabric scarps tied at the handle just because it was bothering me how stark white it looked. I like it but I am sure someday my man willl take them off before heading off for treats.

I think it's great and the best part about it is it looks pretty much like I imagined it in my head!
Don't you love when that happens?

I will be working on the little man's costume this week and hopefully will have it posted next week...I'd love for you to stop back in to see it!


Monday, October 8, 2012

Bewitching

Last year I made myself a Halloween headband for the holiday, you know since I was pregnant and not dressing up. I love to dress up for Halloween but haven't done it in years. I wasn't planning on making another headband this year until a nice trip to Jo-Ann's last week. And by nice I mean a leisurely, calm, quiet, walk up and down every aisle if I wanted to by MYSELF kind of nice trip.

The handy husband said he would run to the Wal-Mart across the parking lot with the kidlets and get the milk and coffee we had run out of. Who needs romantic movies? Chivalry at its finest.

It was like being on vacation! :)

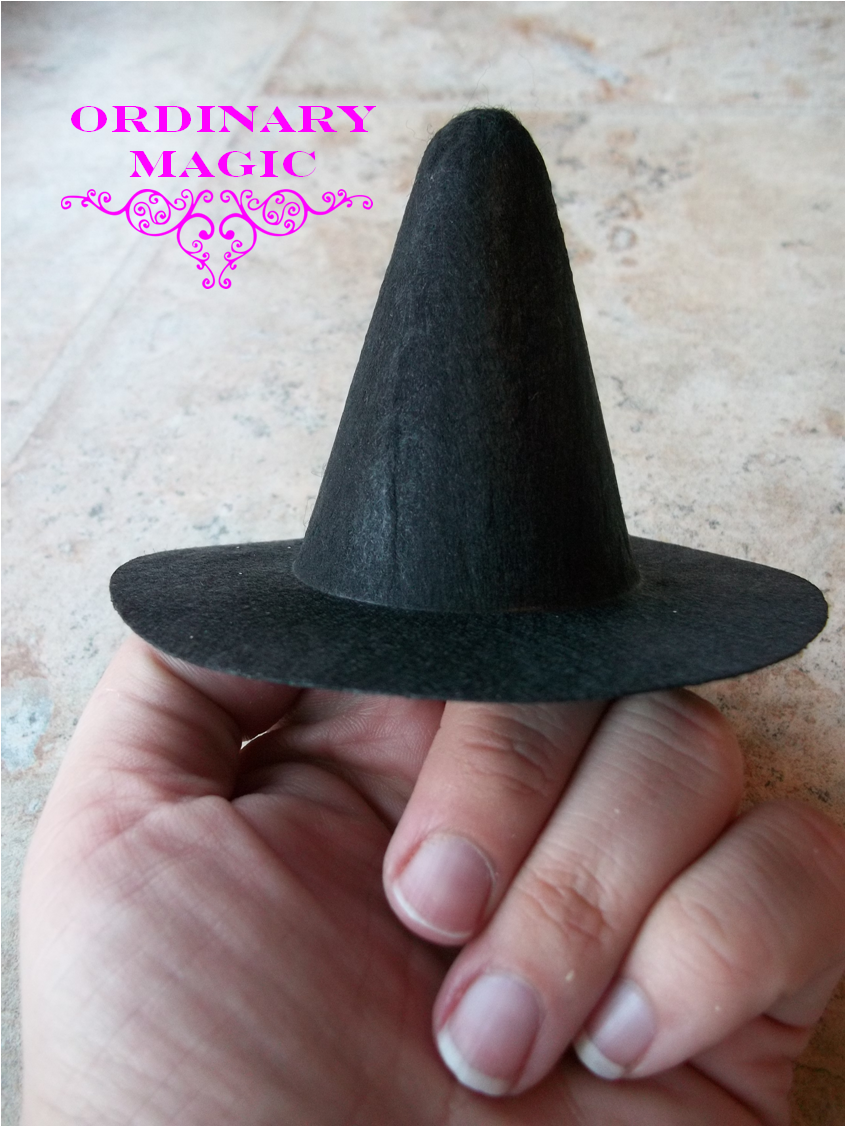
While perusing all the craft supplies I could ever need (and quite a few I never will, but still I looked because, hey, I had no time limit!) I came across this little cutie.

I am pretty sure it's for a doll. I think it was $1.99 or something and since I had one of those 20% off your total purchase coupons I bought it. And, to show you just how tiny and cute this thing is...
it fits on my finger!

I went through my stash of supplies and embellished it a little. I used the same black netting stuff from last year and added some orange ribbon and I made a little fabric flower out of some orange and black polk a dot fabric from yet another past project. I found this black, sparkly headband in the value bins at Jo-Ann's-the ones where you stand in line for the next available cashier-for $1! Perfect!

 
(I hate being in my own pictures but it was naptime for everyone else in the house:) )
 
I think it's cute but I may try making another one. This one is for a cute, silly witch I think. I am thinking one for a chic witch, a classy witch...maybe lace, feathers, glitter or sparklies of some kind? How would you decorate a witch hat?

And, because someone woke up from his nap in the middle of this, how cute is this little goblin??
 
I'll be saving this to put on display when he graduates high school :)

Monday, October 1, 2012

Inexpensive Halloween 'wreath'

I just made this for my door this year to replace my harvest theme wreath that I used to hang from September through thanksgiving. I made this from very inexpensive materials and most of them I had on hand already.

I always say that I wish I was one of those people that could look at something and say "I could turn this into a.....". Sadly, I am not. I usually get my ideas from other people who can do that.

 But, not today!

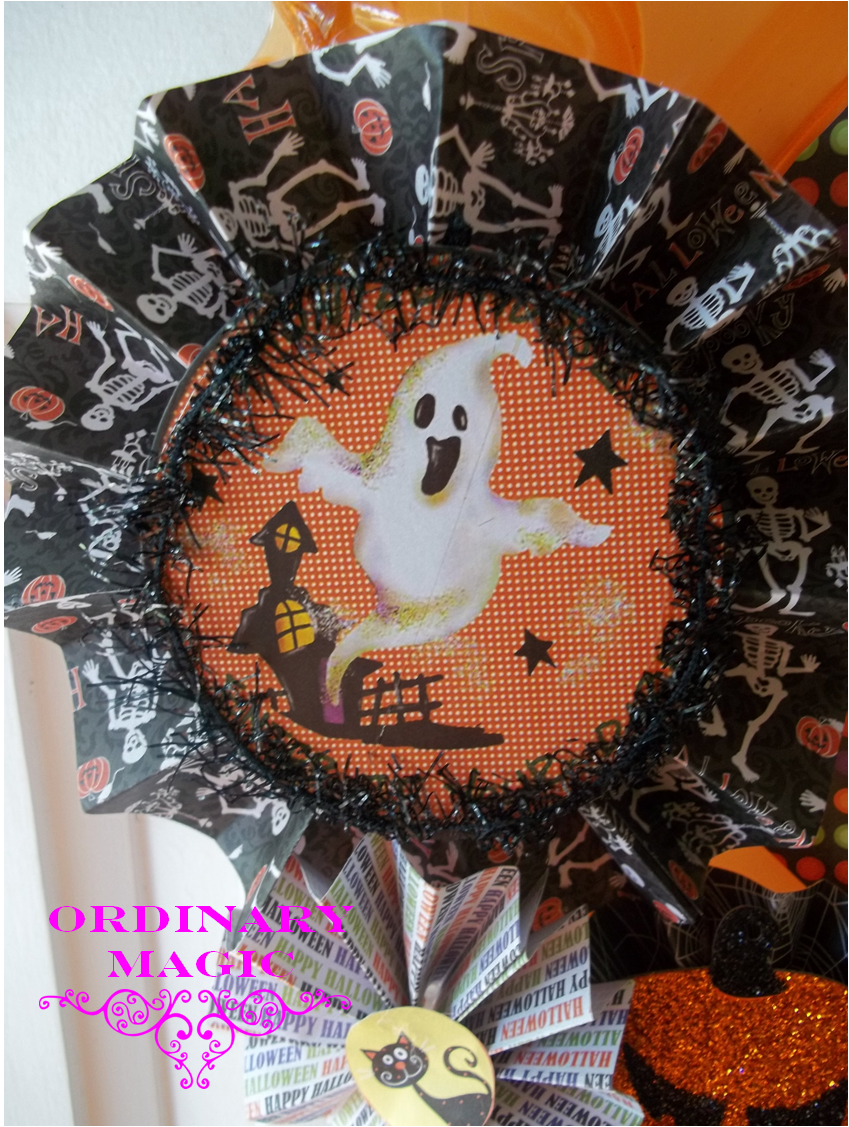
I went looking at my local Dollar Tree for some inspiration and found an orange halloween platter with jack-o-lanterns all around the edge. I then picked up this sparkly 'Boo' decoration at Walmart for $1.97 (I eventually removed the pumpkin piece from the letters to be used elsewhere in the project)
 I found these really cute pieces at Christmas Tree Shops for $1 each!! I knew I could turn them into something around my house. I got three-the one I used in the wreath isn't in the photo...oops :) Those ribbons are actually about three feet long-I cut them off for the wreath and re-used them in another capacity but I am still thinking of where these two could go with ribbons intact.

 Add some scrapbook paper and here's my wreath:


I love it! I had never made the paper pinwheel things before but once I figured it out it was simple and I am so happy with it. I used three pieces of twine (tied together for extra support) as the hanger....just hot glued to the back of the platter. Those ribbons are the ones I cut off of the $1 ghost decoration in the center of the big pinwheel. The pumpkin in the other pinwheel is the one I cut off of the 'Boo' sign. Because I had the twine and paper already in my supplies I only spent $3 on my wreath.

Now, go to your local dollar store, thrift store, wherever you like to shop and find your own inspiration and turn it into something other than what it was intended for! :)


I'm participating in this week's challenge!

Visit thecsiproject.com


Crafty Confessions

Monday, October 24, 2011

Halloween Headband

I joined Pinterest about 4 weeks ago. One of my friends had invited me-I didn't even ask. I had heard about this place all over the internet and it seemed EVERYONE and their brother was begging for someone to invite them. This must be something good.

I must admit I don't get it. I am not addicted. I don't even go on everyday. Is there something I'm missing?

Yeah, I have several boards and add to them every once in a while but I think I would have survived without it. So far.

It has given me lots of inspiration and ideas for projects so it isn't a bad thing at all. In fact I saw things like this headband all over pinterest for Halloween and I thought: "I could do that!"

I googled some directions for the rose thingy's and got to work.

I bought two of those fabric quarters for $1.99 at Jo-Ann's and used maybe a 1/4 of each one. I found the glitter netting stuff with the rest of the halloween decorations and craft stuff. It was 2.99 but I went three weeks before the holiday so of course everything was already 50% off. I made the rosettes, attached some bling I had on hand and glued the whole thing to felt in the order I wanted and cut it out of the felt. I added the netting to the felt first and then put the flowers down on that. I sandwiched my headband between the felt that held the flowers and another plain piece of felt and I was happy with it.

I am not happy with how my pictures turned out so please forgive me.

I am looking forward to wearing a lot this weekend....we have several trick or treating and other Halloween events to go to and then there's the big candy night! I think I could re-do this for any event or holiday by changing the colors and embellishments.

Happy Halloween to you!

Haunted house and a Treat Bag!

These, again are both crafts that I made last year...when I first got back into crafting. And went crazy with it.

But, since I didn't have a blog I can feature them now.

The haunted house was originally a unfinished bird house from Michael's. I don't remember what I paid for it though. I painted it black, mod podged some halloween themed scrapbook paper on the two sides of the roof and added some other embellishments that I found in the scrapbook section. I thought about putting it on a candlestick or something this year to give it height but I never did. Maybe next year. Or the one after...


I made this treat bag that I originally found here at eighteen25 (one of my first craft blog obsessions!) As you can see from the picture on the website and my picture I didn't get too creative with mine. I made mine look pretty much just like the one they made. I love it and hope my daughter uses it for years to come and am planning on making one next year for her sibling. It folded up nicely for storage this past year and when I pulled it out of the box and fluffed it up a bit it looked as good as new. So much easier than trying to store those buckets!


Monday, October 17, 2011

DIY No-sew Halloween Costume

I finally finished the halloween costume I promised to my niece. Yes, if you haven't read my entire blog yet I LOVE my nieces and do so much for them since my sister is craft-challenged :) I was planning on making my daughter a costume but when I found the perfect frog at a Mom2Mom sale for $5 that would keep her so warm, I changed my mind!

My niece decided months ago what she wanted to be and I told my sister it would be SO easy....it was! And, very inexpensive if done right.

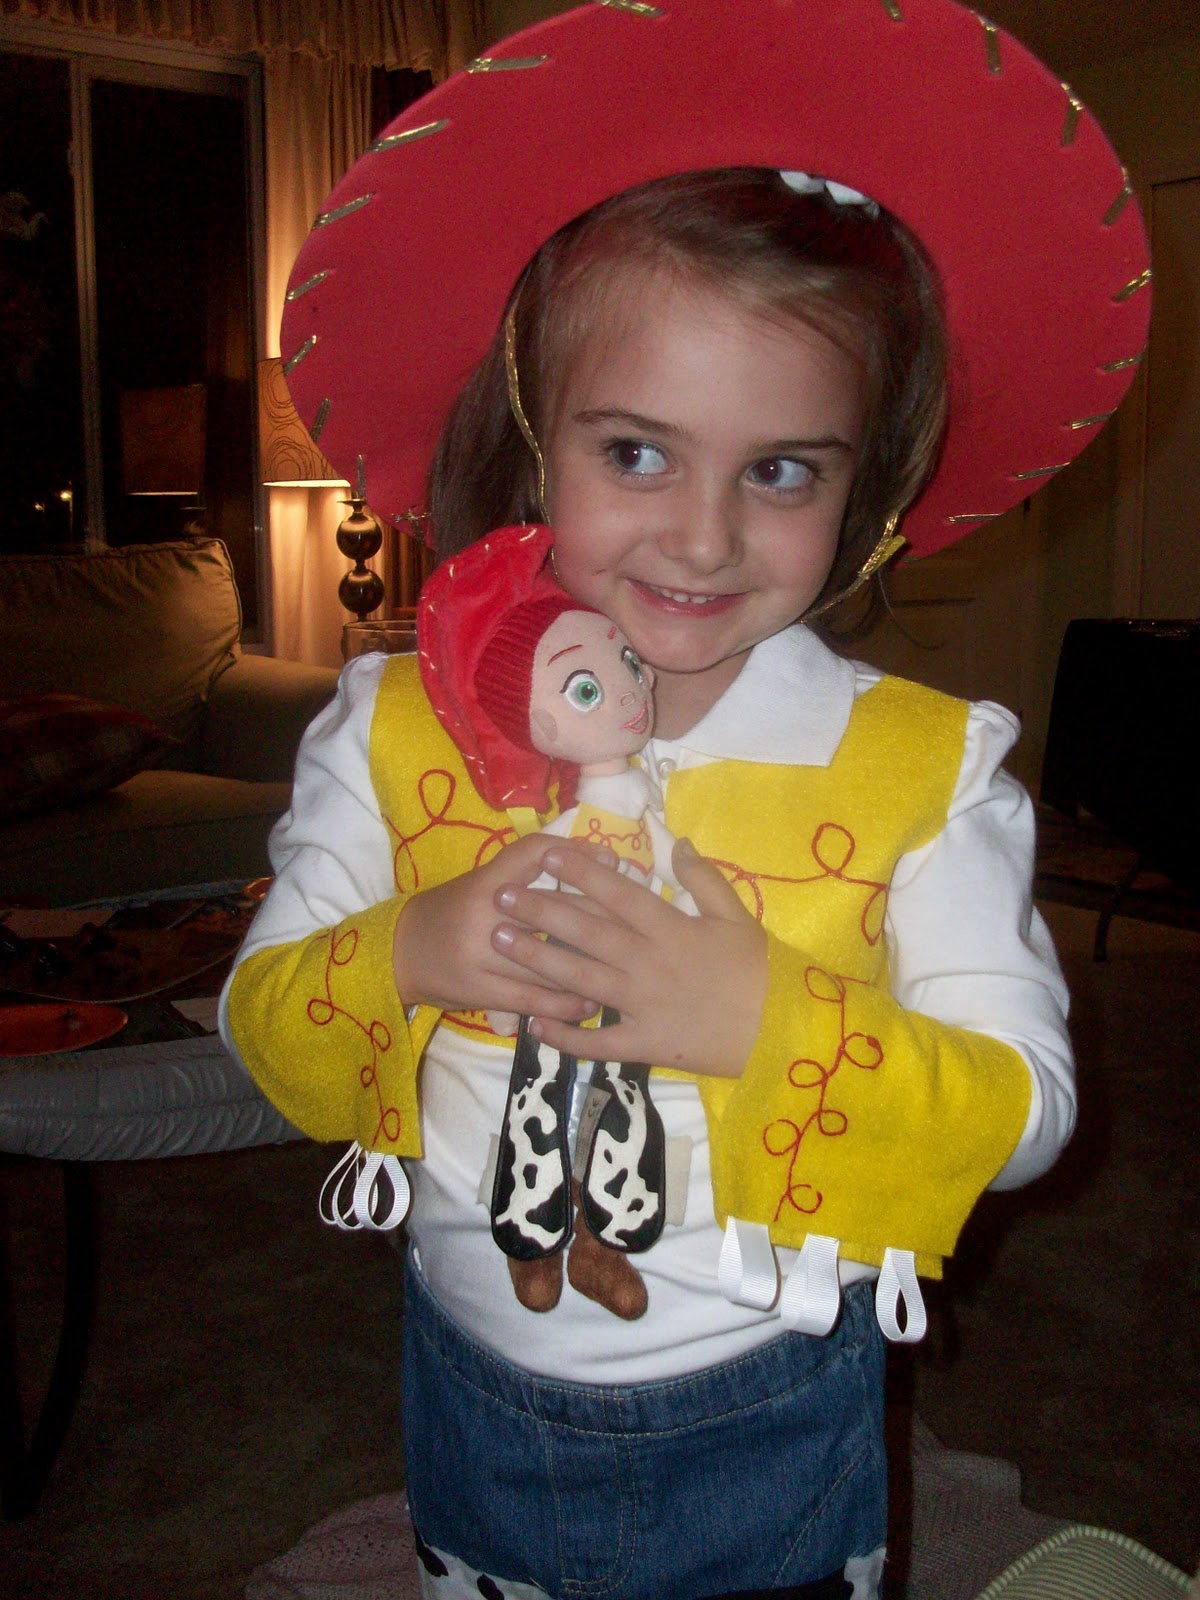
These are the main characters in this project and I will see if you can guess what my niece will be going as this year:
If you guessed a cute little cowgirl from a big movie, you'd be right!

My husband and I babysat for our nieces back in the springtime and we watched Toy Story 3 with them. At first they did NOT want to watch this movie. I think they are afraid of the unknown and they had only seen a few minutes of the first Toy Story and freaked out. But, we took our chances and they LOVED it. In fact it was all they could talk about the next mornng. Thus, began an obsession with Jessie for my oldest niece. She loves Jessie and squeals with glee anytime she sees anything with an image of Jessie. So, Halloween planning began long ago.

My mom bought the jeans at another Mom2Mom sale for $1 since they would not be wearable outside the costume after this. We searched everywhere for a shirt and my sister finally gave in and gave me one of their $5 outlet store shirts they wear under their uniform jumpers. Jessie has a shirt with the buttons all the way down but ours works just as good. I got the cow print fabric on sale for $3.99 a yard at JoAnn's and only used 1/2 a yard. The felt squares were .29 each and used two whole ones. My niece is an average sized 5 year old if that makes any difference to this project :) The rest of the things I had on hand but I also needed red fabric paint, fabri-tac and white grosgrain ribbon.

For the pants I started by folding the jeans in half and tracing one leg at a time:
Don't go all the way up to the waist though since Jessie's are more like chaps. Isn't the little rufle on the bottom of the jeans a cute touch? :)

Once traced I cut my material and attached it to the jeans with the fabri-tac glue. I only did it on the four main sides of the leg and not the middle  since you would be able to see the glue lines through the material-it's very thin. I set them aside to dry and began working on the shirt.

I folded the arm to the back and the collar inside the shirt so the seams would be more visible. Then I laid my felt on the shirt and found the seams with my pencil and just followed the lines of the shirt with my pencil to trace them on the felt and had my basic piece. You need one for each side of the chest with room for the buttons in between. I also attached these to the shirt with the fabri-tac. I used the red fabric paint at this point to make the designs on the yellow felt. I Googled a picture of Jessie to make sure I got it exacly right. I would highly recommend having a good picture of her on hand for this.


I used about 3/4 of each square for the shirt and then took the last 1/4 piece of each felt square to make the sleeve cuffs that Jessie has. Seriously, Google it. They were just a long, wide rectangle of fet that I painted the same curly cue desing on. Once dry I cut three pieces of white ribbon for each cuff and hot glued the ends together to make a little loop and glued them to one inside side of the cuff. I added a piece of velcro on each inside end so they would stay on my nieces little wrists.

Now I was done and I could't wait to see her in it. I realized after I was done that Jessie had a belt and my costume didn't. The pants have no belt loops so we would have to brainstorm that one but my sister  told me not to worry about it so our Jessie doesn't have a big belt. I was going to just embellish a red dollar store foam hat for her but my sister treated my niece to a 'prize' for doing something or achieving something and my niece picked out Jessie's hat at the Disney store for her reward. I think she got it on sale for about $8. The boots are something my niece saw at Gymboree and proclaimed that she HAD to have them to be the 'real' Jessie. My sister got them on sale for $9.99. So, the costume itself cost me about $8 to make and had I made the cheap hat and she wore her own shoes it would have come to about $10 but it came out SO CUTE!!


When she had it on she came running into the room and threw herself at me in a big hug she was so excited. She kept thanking me and thanking me and told me how excited she was to show her friends at school. I can't wait to see her in the Halloween parade the kindergarten class puts on :)
 
 
I'm up for the challenge!

Visit thecsiproject.com

Monday, October 10, 2011

Jack-O-Lantern cake

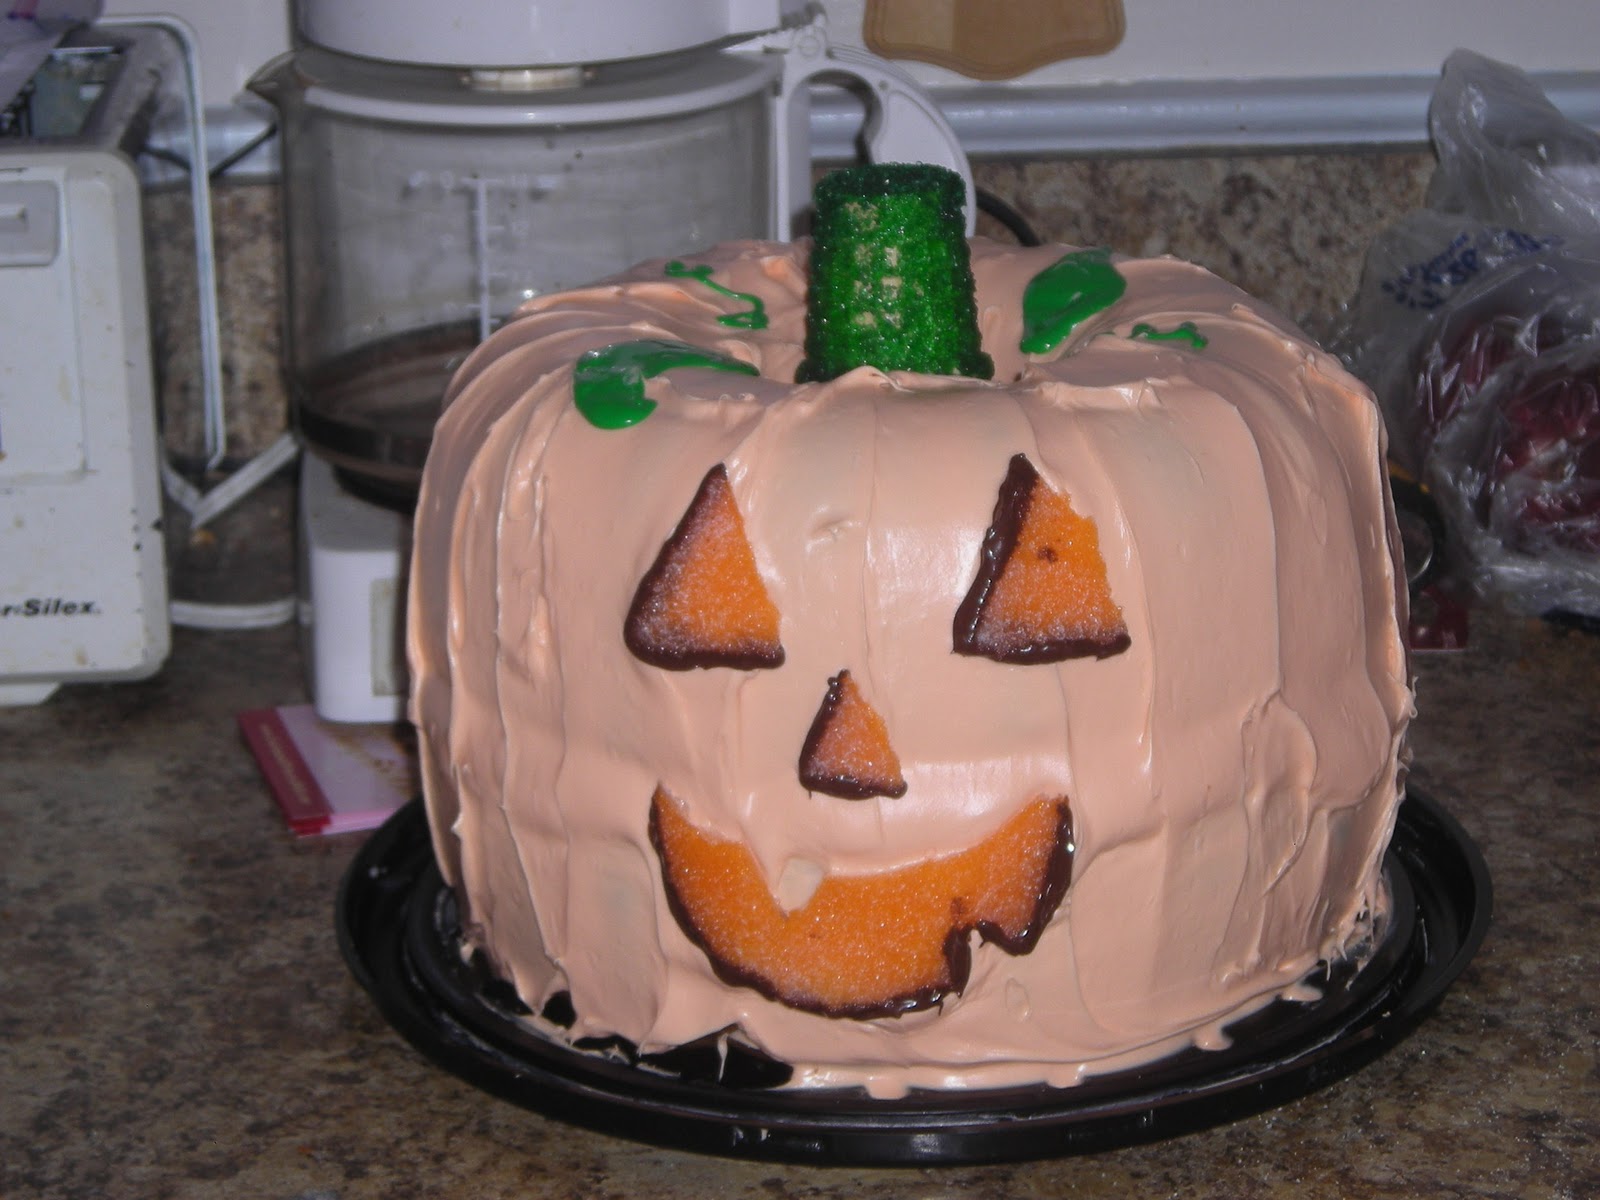
This past weekend was the big fundraiser at my nieces' school. Not only are they in Kindgerten and Pre-3 full time this year but my brother-in-law works in the parish offices and my sister, their mom, is a teacher there now too. So, they have to put in volunteer time as parents AND staff. Plus, this is something for my two perfect and absolutely wonderful nieces so the whole family is willing to help :) My mom cooked up a storm: two kinds of cupcakes, two kinds of brownies and halloween cookies galore. She packed them all in pumpkin themed wrap and sent them to school on Friday for the bake sale portion of the event. My sister called her that morning after getting to work to tell her how happy and excited the 'bake sale ladies' were with everything. Come to find out they weren't getting as much in as they normally do (they ended up getting a TON of stuff in later that day and sold out by Saturday night!) and they had just found out that the lady who makes them a few fancy cakes to raffle off or sell for a bigger price wasn't going to make them anything this year. They had no 'big' eye catching item. I wanted to help and since I know how to basically decorate cakes with the flowers and all that fancy stuff I wanted them to have a special cake. But, I was already down at my mom's house for the day and had none of my tools so I knew it would have to be relatively 'easy'. I found the instructions for this cute little guy over at Family Fun and I am so happy with how he turned out and how much fun he was to make. My mom helped me out a LOT so I think that was part of the fun! I used two bundt pans, three Betty Crocker Spice Cake mixes (so GOOD!!) and two tall cans of whipped frosting. The stem is a ice cream cone and the face is flattened and cut out gumdrops.

I have a few things I did differently and a few tips to offer.

-if you are making this for an event at your own home it's great. If you are making this for something where you will have to transport it-be careful!!! He did not look like the picture once he got to the bake sale..I had to do some damage control because he shifted between the layers. If I ever do another one and have to move it I will definitely put dowels in a few spots.
-I couldn't find a green ice cream cone so I bought a regular one and planned on covering it with green icing. I changed my mind once home. My mom had green sugar crystals and Karo syrup. I simply covered the cone with syrup via a basting brush and then sprinkled the crystals all over it. I let it dry and it was perfect.
-When you dip the pieces of the face in the chocolate let it dry or cool a bit. You can see my fingerprints in a few places where I touched it while trying to get them in place as soon as the chocolate was applied...oops!

I don't know who ended up winning the raffle but I have heard it was a hit with the kids and they ended up having to come up with a cover so the little fingers would stop touching it!

Definitely something I will try again in the future :)

A ghostly re-purpose

This is one of my favorite Halloween decorations this year and I don't know why. I made it last year-maybe it's because it was so cheap and easy. Or maybe it's because it's spooky but in a cute way.

I'm talking about that ghostly guy on the right :)

He started out as a $1 purchse from Salvation Army-it's a sconce cover, I think.

I simply painted the inside with mod podge and then sprinkled it with TONS of white glitter-be sure you do this over a piece of paper or a box top or something because this project got extra glitter everywhere! I used my black paint pen again to make the face and tied some halloween ribbons around the little piece at the top and was done. So quick and inexpensive. I put one of those LED battery operated tea lights underneath him too...that's the best part! My daughter makes me turn him on everyday...she even wants him on during the day when you can't even really tell he is lit up but he's cute nonetheless so who wouldn't want him glowing? :)
Tuesday, October 4, 2011

Halloween in my kitchen

I think I finally feel ready to post some of my Halloween crafts!

I made all of these last year when I really got back into the crafting thing. I had been dabbling in little things since my daughter had been born in January but there were so many cute and spooky crafts out there that I jumped in with both feet so to speak. Plus, now I had a kid who could enjoy it and I wouldn't look so crazy for going hog wild over Halloween as an adult :)

The first thing I would like to show off is my dining room table. My dining room is part of my kitchen with an island separating the two so I don't even know if it qualifies as a 'dining room' but that's what I call it. I don't really do much in the kitchen/eating are but I am slowly spreading out around the house for Halloween.

I saw a similar ceramic pumpkin last year at Hobby Lobby for $30 and thought to myself....I can do this. I went to Jo-Ann's and got one of those 'fun-kins' when they were already 50% off so I got it for $5. I also picked up a black paint pen, thick tip for this project for sure. I found a 'B' in Word that I liked, enlarged and bolded it and printed it out. Using an exacto knife I cut out the letter from the paper so I had a stencil. As carefully as I could I taped it to my pumpkin...not so easy to do on a sphere! I traced the 'B' with a pencil, took the paper off and filled it in with my paint pen. I added a few crystals from my scrapbook stash to bling it up :) I love it and keep it out even past Halloween. For Halloween it sits in a wreath I made in college out of fabric dipped in starch and tied to a wire hanger wreath form. I pull that out after Halloween but it is old and kind of crummy looking so it looks much better on the table than on my door :)All in all it's much better and cheaper than the Hobby Lobby version.


The other pumpkins that surround it are Dollar Tree or Big Lots pumpkins that are cheap-o. The glitter ones I probably don't have to explain but glue+glitter=fabulous! The bigger ones are just spray painted and the white one has graduated stick on bling in the natural creases of the pumpkin. I keep these out with the center one much past Halloween as well since they are more fall than spooky.

The last thing for today is in the corner of my dining room. I have this plant stand in the corner that used to have a big fake plant on it before I moved in. It wasn't very pretty so I got rid of it but love the stand and haven't figured out what exactly to do with it so most of the time it stands empty. I bought this container to use in a candy buffet for a shower I hosted. I think it was $7 at Marshalls and I think it's beautiful. I had the fillings already. I used to put this stuff in containers or on countertops all throughout my house. I put it all in the vase with the leftover leaves from my wreath and topped it off with another glitter pumpking and I was qutie pleased. Again, this will also probably stay out through Thanksgiving too. Fall is definitely in the air and now it's throughout my house too :)