CLICK HERE FOR FREE BLOG LAYOUTS, LINK BUTTONS AND MORE! »
Showing posts with label recipes. Show all posts

Monday, November 5, 2012

The Good Wife

***Ok, that's it!!! Before I start the real content of this post I am asking for HELP! I consider myself a very basic blogger-if you hadn't noticed by my simple and boring blog setup :) But, I can't for the life of me figure this out. I want to reply to comments!!! How do I do this?? Anyone? I have tried figuring it out on my own and have done everything I've read online regarding this topic. Still, nothing works. What am I doing wrong? How can I fix this??? Leave me a comment and maybe I can get back to you :/ Thanks to anyone who can help!****

A few weeks ago my husband confessed he was tired of taking sandwiches all the time in his lunch everyday. I was frankly in the same type of mood. Sometimes we buy him some frozen meals he can microwave but we hadn't in forever. Other times he takes leftovers from dinner the night before but even that wasn't happening that often anymore-if someone wouldn't eat so much at dinner maybe we would have more leftovers!!! So, I did a bunch of research and found some ideas for 'muffin tin meals' (that's the search I used) over on the Pillsbury website. They used a can of their refrigerated biscuits and different fillings. I didn't care for their fillings either because I didn't have the right ingredients or I knew they weren't my husband's taste. So, I made my own using their biscuit idea. I had a bag of chicken tenderloin pieces defrosted that I hadn't used yet so I thought this was the perfect opportunity to try some ideas of my own out. I buy big pack of chicken and then divide it myself and freeze them in 8's. I only used 7 for these because I put one aside for my son's dinner :) If you do this, you may get more than the 15 I did if you use all 8.


I started with 2 cans of biscuits and I sprayed my muffin pan with a boat load of non-stick spray. I didn't want these beauties to stick after all the work I would be doing:
 I flattened each biscuit in my hand first. Then I simply pressed it in to the muffin tin like a bowl, just waiting for my delicious filling!
 I came up with three different varieties and collected the supplies I would need for each.


 I diced my chicken up and mixed it with my above ingredients. I used one of my normal kitchen spoons and dropped a spoonful into each biscuit cup.
 After topping them with a bunch of cheese they went into the oven for about 15 minutes.
 And, they came out perfect! And, they smelled amazing too!! They popped right out of the muffin tin with just a bit of help from a butter knife to lift  an edge for me to grab.
 After cooling on a wire rack I wrapped them each individually and labeled them. Now, my husband just has to open the freezer, pick his taste for the day and walk out the door for work. I can't wait to hear how he likes them.

 Do you have any other ideas for fillings?? We are trying to come up with some I could make with ground meat as well as more chicken ideas. What kind would you make?

Monday, April 23, 2012

Triple Layer Lemon Pie

Have you checked out Kraftrecipes.com? You should. They have some of the easiest and idiot proof recipes. I have tried a TON of them and it's usually the first place I look when I want something quick and simple.

I made this pie for dessert after Easter dinner at my house. This is the 'laid back' meal of the day with just my husband and I and the kids with my parents.

Now, when I say idiot proof I mean only if an idiot reads directions and package sizes.

Be careful. I thought there were only TWO sizes of Jell-O. The really big box and the small box. However, there are TWO small box sizes and evidently you have to search high and low and in the back of the shelf and all around to find the right one in lemon flavor. The recipe calls for 2 packages of 3.4 oz. jello. I just grabbed the small box that I thought was right...no, that would be the 2.9 oz box. Really??? We  need two boxes that are THAT close is measurement??? Needless to say my first pie did NOT turn out correct but after I bought everything over again adn got the right size this pie was delicious. Even my mom who doesn't care for lemon meringue pie and my husband who doesn't eat desserts often thought it was good.

Go here for the original recipe.

Triple layer lemon pie:

You will need:
2 pkg 3.4 oz. Jell-O lemon flavored instant pudding
2 cups cold milk
1 T lemon juice
1 graham cracker pie crust
1 tub Cool Whip, thawed, divided

Beat pudding mixes, milk and lemon juice with wire whisk about 2 minutes. This mixture will be thick. Spread about 1 1/2 cups of mixture into bottom of pie crust.

Whisk half of Cool Whip with the remaining lemon pudding mixture from above. Spread over pudding layer in pie crust. Top with remaining Cool Whip.

Refrigerate for 3 hours or until set.

Beautiful Breakfast wreath

I bookmarked this recipe over a year ago and couldn't wait to find an occasion to make it. This year I decided to make it part of our Easter breakfast. We do brunch with my family after church but we do breakfast and baskets at our house beforehand and this was a hit! I served it only with our hardboiled eggs and some sweetbreads....best meal of the day!

I originally found the recipe at Bacon Time with the Hungry Hungry Hypo. My husband loved it so much he began thinking of different variations we could do with this not only for breakfast but for dinner too! The only picture I got of it though was the one HE took of the whole table before we ate. He was that excited over how good the whole meal looked I guess...he NEVER picks up the camera for anything!

All you need for a really good breakfast are one roll of crescent rolls, five eggs (scrambled), pre-cooked bacon, and shredded cheese. That's IT!!! If you click on the link she has step by step pictures but here is my run down (more for me in case the link ever goes inactive!)

Separate your eight crescent rolls and lay in a circle on a pizza pan covered with parchment. The wider ends should all overlap in the center of the wreath with the pointy ends on the outer edge. Almost looking like a sun. Lay one piece of precooked bacon on each piece of dough. Spoon your eggs  onto the wide ends of the crescent rolls in the center of the wreath but not filling the 'hole'. Sprinkle some of your cheese on top of the eggs and bring each pointy end of the crescents up over the eggs and into the middle. Top the wreath with more cheese and bake until the crescent rolls are done. You should have something that looks like this:

Again, there are much better pictures on the original link but we were too hungry to try this that we didn't stop to take any more pictures!

Wednesday, April 11, 2012

Easter Cupcakes

I haven't been doing much 'magic' lately outside of making sure two children survive each day and get their basic needs met. Well unless you count not drowning in laundry magic :) But, I do have a few things that I am hoping to blog about soon.

Starting now.

I asked my mom to let me provide Easter dessert. She does a fancy brunch and when my siblings leave to be with their 'other sides' they come home with us (my 'other side' is out of state) and we do a much lower key dinner. I found these adorable cupcakes on Pinterest and made some changes to make them less time consuming for me. I decided to do this at 9:00 the night before Easter when I was exhausted and kicking myself for stretching myself too thin for the weekend :)

Here is the link to the instructions. And, her blog is amazing! Check out more than just this recipe. I bookmarked the whole thing instead of just the one link!

And, here is my version of the cutest dessert ever...

The kids loved my cupcakes and even a few of the adults indulged. I think they came out great and was really proud of myself.

Instead of the mini chocolate chips I took mini brown m&m's and flipped them over so the 'm' didn't show. Instead of piping on a beak I went through my sprinkle stash and found a container of black and orange large circles. I bought them and only needed the black ones so I was lucky to have a bunch of ornage ones left. I snapped one in half and put both pieces, broken side down, in the frosting and it looks just like an open beak. I also didn't add any feet or wings to mine and I think they are just fine without them.

The only problem with these is I still have about six of them left and they are staring up at me every time I walk through my kitchen...very hard to resist :)

Monday, October 10, 2011

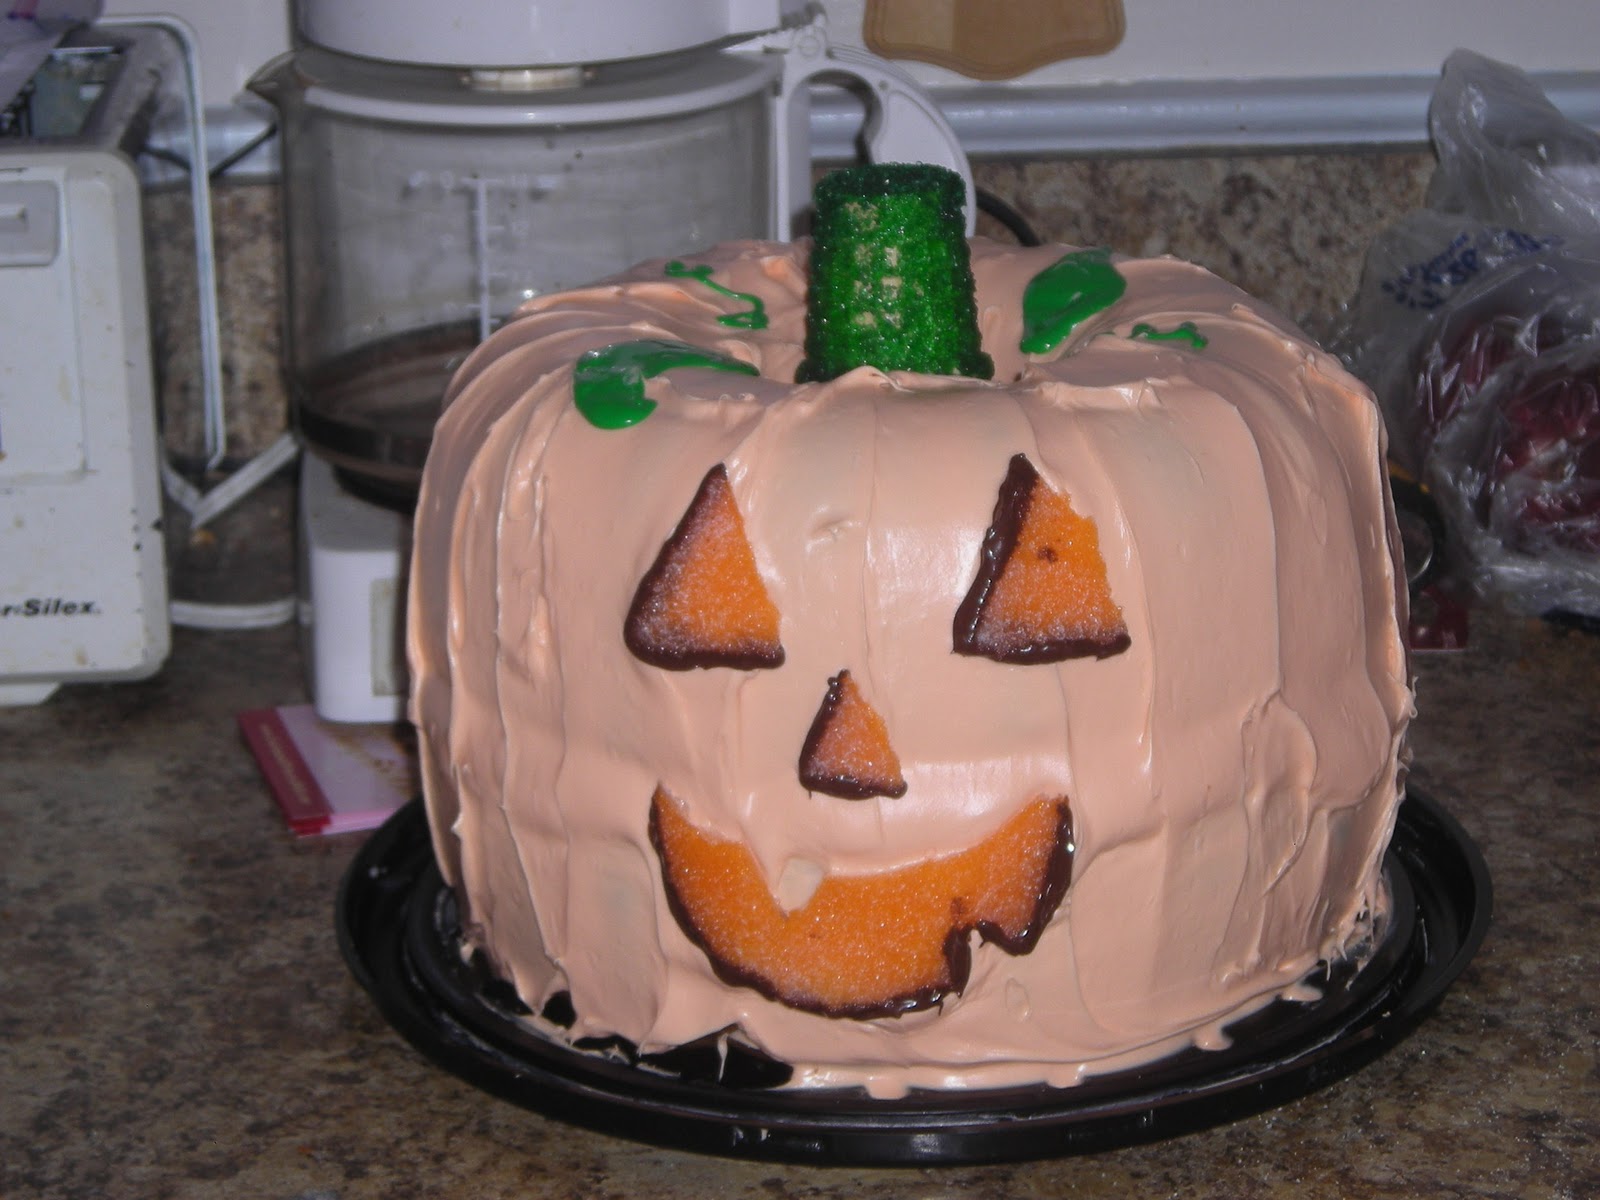
Jack-O-Lantern cake

This past weekend was the big fundraiser at my nieces' school. Not only are they in Kindgerten and Pre-3 full time this year but my brother-in-law works in the parish offices and my sister, their mom, is a teacher there now too. So, they have to put in volunteer time as parents AND staff. Plus, this is something for my two perfect and absolutely wonderful nieces so the whole family is willing to help :) My mom cooked up a storm: two kinds of cupcakes, two kinds of brownies and halloween cookies galore. She packed them all in pumpkin themed wrap and sent them to school on Friday for the bake sale portion of the event. My sister called her that morning after getting to work to tell her how happy and excited the 'bake sale ladies' were with everything. Come to find out they weren't getting as much in as they normally do (they ended up getting a TON of stuff in later that day and sold out by Saturday night!) and they had just found out that the lady who makes them a few fancy cakes to raffle off or sell for a bigger price wasn't going to make them anything this year. They had no 'big' eye catching item. I wanted to help and since I know how to basically decorate cakes with the flowers and all that fancy stuff I wanted them to have a special cake. But, I was already down at my mom's house for the day and had none of my tools so I knew it would have to be relatively 'easy'. I found the instructions for this cute little guy over at Family Fun and I am so happy with how he turned out and how much fun he was to make. My mom helped me out a LOT so I think that was part of the fun! I used two bundt pans, three Betty Crocker Spice Cake mixes (so GOOD!!) and two tall cans of whipped frosting. The stem is a ice cream cone and the face is flattened and cut out gumdrops.

I have a few things I did differently and a few tips to offer.

-if you are making this for an event at your own home it's great. If you are making this for something where you will have to transport it-be careful!!! He did not look like the picture once he got to the bake sale..I had to do some damage control because he shifted between the layers. If I ever do another one and have to move it I will definitely put dowels in a few spots.
-I couldn't find a green ice cream cone so I bought a regular one and planned on covering it with green icing. I changed my mind once home. My mom had green sugar crystals and Karo syrup. I simply covered the cone with syrup via a basting brush and then sprinkled the crystals all over it. I let it dry and it was perfect.
-When you dip the pieces of the face in the chocolate let it dry or cool a bit. You can see my fingerprints in a few places where I touched it while trying to get them in place as soon as the chocolate was applied...oops!

I don't know who ended up winning the raffle but I have heard it was a hit with the kids and they ended up having to come up with a cover so the little fingers would stop touching it!

Definitely something I will try again in the future :)

Monday, August 22, 2011

Olivia cupcakes

As I have mentioned before, my sister lets my two nieces choose the theme for each birthday.

And, let me assure you that these themes are well thought out and chosen MONTHS in advance. So, I wasn't surprised that this year my oldest niece wanted an Olivia (the Nick Jr. pig) party for her big 5th birthday. If you don't know what I'm talking about here is Olivia:

It was decided that we wouldn't theme the food to match the party even though my mom and I thought serving hot dogs and pulled pork would be kind of funny :) My sister bought some Olivia themed items from online-cake plates and balloons. But, everything else was just red and white everything since those are Olivia's favorite colors. My niece even wore her Olivia t-shirt and of course she had to wear the Olivia tutu and hair bows from her dress up set and requested white and red striped tights like this one picture of Olivia she has so my sister bought her some leg warmers.

I have made EVERY birthday cake for her since year one. I am very proud of this. My other niece could care less who makes it as long as she gets it but my oldest niece won't take anything unless I make it. Of course she saw a picture over my sisters should on-line one day and it was the most ridiculous and time consuming two layer fondant covered cake and I somehow managed to say NO to that one. I am not that talented or patient either! I found these cupcakes on nickjr.com and we convinced her they would be great. You should have heard the squeals of excitement from both nieces when they saw the finished product. I didn't make the cupcake recipe but rather used a funfetti box mix which is what the birthday girl requested. I also used canned frosting and tinted it myself. The one thing I should have done but didn't read the recipe at that point was to make this in MUFFIN tins. They need to be a bit bigger than a cupcake for the template of the nose to work and still have room for the rest of the face. We made them work, mistake and all...Olivia just couldn't have a mouth and the ears had to go straight in the cupcake and stand up in the air instead of kind of off to the sides as in the pic on the website. It didn't look exactly like Olivia but it looked like a pig who may resemble Olivia :) Everyone loved them and enjoyed the extra bit of chocolate that the ears and nose provided.

A successful birthday treat if there ever was one!

Wednesday, June 1, 2011

Watermelon cookies

I was in charge of dessert for our Memorial Day family picnic. Again. I love to bake so this excites me. I was reminded of what I made LAST year for our picnic. I can't talk about this years dessert because I don't have a picture. My mom was getting something out of the cooler and when she went to put the dessert I made back in she accidentally dropped it but managed to catch it. The top still got messed up though and I had yet to get a picture so there isn't one :( But, I have a really great recipe WITH pictures from last year to share! The reipe comes from Amanda's cooking and I seriously saw this the day before I would need to make it and luckily had everything on hand!

Watermelon Cookies (From Amanda's cookin)

Don't be a dunce and forget to dye your dough before rolling out, cutting AND baking your first batch :)

Sugar Cookie Dough3 3/4 cups all purpose flour
1 teaspoon baking powder
1/2 teaspoon salt
1 cup cold unsalted butter, cut into 1/2 tablespoon slices
1 1/2 cups granulated sugar
2 eggs
2 teaspoon vanilla extract
6 drops red food coloring

1 cup miniature semi sweet morsels (I didn't have mini ones so I used regular ones...mini would be better!)

Glaze
1 1/2 cups powdered sugar, sifted
2-3 tablespoons milk
green paste food coloring OR 15-20 drops green food coloring

In a medium bowl, whisk together flour, baking powder, and salt. Set aside.

Place butter slices, sugar, eggs, vanilla, and red food coloring in a large bowl. Beat on medium speed until incorporated. Don't be concerned if there are small lumps of butter still visible. Turn mixer down to low and gradually add flour mixture. Mix well until no flour is left. Gather all the dough together using a sturdy rubber spatula.

Remove dough from bowl and separate into two batches. Place one batch between 2 sheets of parchment paper and roll out to about 1/4" thick. Repeat with the other batch. Chill in the refrigerator for two hours.

Preheat oven to 400 degrees F and have insulated baking sheets ready.

*Note: Insulated baking sheets are best for baking sugar cookies. If you only have regular cookie sheets, line them with parchment or a silicon baking mat.
Remove one batch of rolled dough from the refrigerator. Cut out circles with a cookie cutter or biscuit cutter.

Use a sharp knife to cut each circle in half. Place the halves on the baking sheet, about 1" apart.

Gently press miniature semi sweet morsels into each semicircle.
Bake for 6-8 minutes, checking after 6 minutes. Cookies will be slightly puffed but not browned. Do not allow cookies to get too brown or you'll have dry crumbly cookies. Remove from oven and allow cookies to cool on baking sheets for 5 minutes. Remove to wire cooling rack and allow to cool completely.

For each batch of cookie dough, after cutting out the circles, gather the scraps together and reroll them, place back in the refrigerator. Repeat until all dough has been used.

For the Glaze 

In a small bowl, mix together all ingredients to form a glaze. You may add drops of milk to thin glaze if it is too thick.

Cover counter with wax paper and place cooling racks over the wax paper to catch drips. To decorate the cookies, roll the round end of the cookie in the glaze, allow excess to drip off into bowl.

Place cookies on cooling racks, excess glaze will drip through onto the wax paper. Wait for glaze to set before moving the cookies

Bumpy Cake!!

While doing some last minute holiday shopping this Memorial Day weekend I saw a bunch of these on display in my local grocery store. If you're from Detroit you know all about Sanders bumpy cake :) Sanders is a local chocolate and ice cream store/parlor that we have here. Their sweets are DELICIOUS! I have grown up with this cake as a part of so many celebrations. When I was a teenager my sister and I discovered that Sanders had concocted a 'bumpy cake' ice cream and we fell in love :) This cake is so great it even has its own Facebook fan page!  I don't know where I got this recipe from since I only have it saved as a word document with no credit given. Bad me. I had no idea back when I got it that I would want to share it. So, I did get it from somewhere online but I don't know where. There are several sites that have the exact same recipe so if you search 'Sanders bumpy cake' you'll come up with this recipe. I can't wait to make one this summer! The recipe gives you the Sanders chocolate cake instructions but I always just make a boxed cake mix. Go ahead and judge-it works for me and tastes fine!

I have two pictures of the cake. The first from the bumpy cake Facebook page of how it 'should' look. The second one is the only picture of one that I made. I of course took it the first time I made it :) I have since learned to be more patient and NOT to pour the frosting until it really is totally cooled. No matter how much I REALLY want a piece right NOW! :)

Sanders Bumpy Cake

For the Cake:
1/2 C hot black coffee or water
1/2 C cocoa
1/2 C oil
1 C buttermilk
1 1/2 t baking soda
1/2 t salt
2 t vanilla extract
2 eggs
2 C sugar
2 C flour

In large bowl, combine coffee and cocoa; beat on medium speed for 30 seconds. Add oil; beat for 30 seconds; add buttermilk; beat for 30 seconds; add baking soda; beat for 30 seconds; add salt; beat for 30 seconds; add vanilla; beat for 30 seconds; add eggs; beat for 30 seconds; add sugar and beat for 30 seconds. Add flour; beat for 5 minutes. Batter will be very bubbly. Pour batter into greased (9x13 inch) pan and bake at 375° for 35-40 minutes.

For the Sanders Buttercream icing:
2 C butter
2 C sifted powdered sugar
2/3 C sweetened condensed milk
2 large egg whites
1/2 cup sifted powdered sugar
1/2 t salt
1/2 t vanilla extract
1/2 cup sifted powdered sugar

Place butter in mixing bowl, add 2 c. powdered sugar; mix at low speed to obtain smooth paste. Whip at medium speed, adding milk slowly and gradually, until light and fluffy. Using a very clean bowl and beater, whip egg whites until stiff while adding the 1/2 c. powdered sugar slowly. Mix this meringue slowly into the above mixture. Add vanilla and remaining 1/2 c. powdered sugar. This last amount of sugar can be doubled if stiffer icing is desired.
For the fuge frosting:
1/2 C buttermilk
1 C sugar
1/3 C dark corn syrup
1/3 cup cocoa
dash of salt
1/2 lb. (2 sticks) butter-divided
2 1/2 C powdered sugar
1 t vanila extract

Over medium-high heat, combine buttermilk, sugar, corn syrup, salt and half the butter. Bring mixture to a boil. When mixture reaches the soft-ball stage, remove from heat. Add remaining butter, powdered sugar and vanilla. This will have a "pouring consistency". TO ASSEMBLE CAKE: prepare cake as directed. When cake is cooled, place cake in freezer for at least 30 minutes. Prepare buttercream icing, then pipe them in stripes on frozen cake, 1 inch apart across the top of the cake. Return to the freezer for at least an additional 15 minutes. Apply cooled fudge frosting to top of cake, covering buttercream rolls completely. Return to freezer for several minutes or more to set