CLICK HERE FOR FREE BLOG LAYOUTS, LINK BUTTONS AND MORE! »

Monday, June 25, 2012

Adding two feet to my living room :)

I've finally gotten around to this little project. It only took me six months. Three months to (find time to) make it and three months to (find time to) hang it

I could have sworn I have showcased this idea before since I made one for my daughter two years ago. But, if you can find the old post, good for you :)

I have a huge wall in my living room that was designated for portraits of my children.

Emphasis on huge. And mostly empty with only two children.

I came up with this idea to fill in the space around the pictures.I have no idea when I made my daughters since I didn't write anything on it. I THINK it was somewhere around three months so that is when I did my son's.

And, then I wrote the date on the back.

Each frame cost $1 each since they are Salvation Army finds that I spray painted black to go with my living room. My daughter being the girl has pink scrapbook paper and my son therefor has blue. I'm traditional.

I originally wanted to do an actual print of each hand and foot. The foot was so easy but have you ever tried to make a handprint of an infant?? Hard! So each hand was just traced while they slept and cut out.


Such beautiful and cute keepsakes :)

Tuesday, June 19, 2012

Candy Arrangement

I made this for Father's Day but in reality it could be given for any type of occasion.

I wanted to give my husband something on the actual day of Father's day. I told him about his big gift a week prior since he began talking about it. I only had one idea for a gift and I didn't want to disappoint him if he wanted to pick something out for himself. So, I told him we would go to the store together and he could choose a new radio for our boat. He was pretty excited.

Still I wanted something for our daughter to give him on the morning of his day. I went to the Dollar Store and came home with the makings of an inexpensive gift.


My husband doesn't like many sweets but I got him some stuff that I've seen him munch on before. I also bought a bag of shredded paper filler. Yes, you could make this part yourself but I didn't want to! I already had the flower pot, styrofoam and those are wooden skewers I use for shish kebabs down at the bottom of the picture.

With a little bit of hot glue I attached the skewers to the candy (after measuring and cutting the skewers); the jolly ranchers and lemonheads got two skewers each. Stick them into the styrofoam, fill in with the shredded paper, add a sentiment or message and there you have it. Very inexpensive and incredibly fun!

Monday, June 11, 2012

Ready to meet Minnie Mouse!

Well, we don't leave for our Disney vacation for another two months but I am so happy to be knocking out some of the Disney projects I wanted to make for our adventure.

I just finished this one this morning. I started it yesterday while my mom was here-she brought my two nieces to play and told me to do whatever I wanted while she watched the kids. Yay craft time!!!

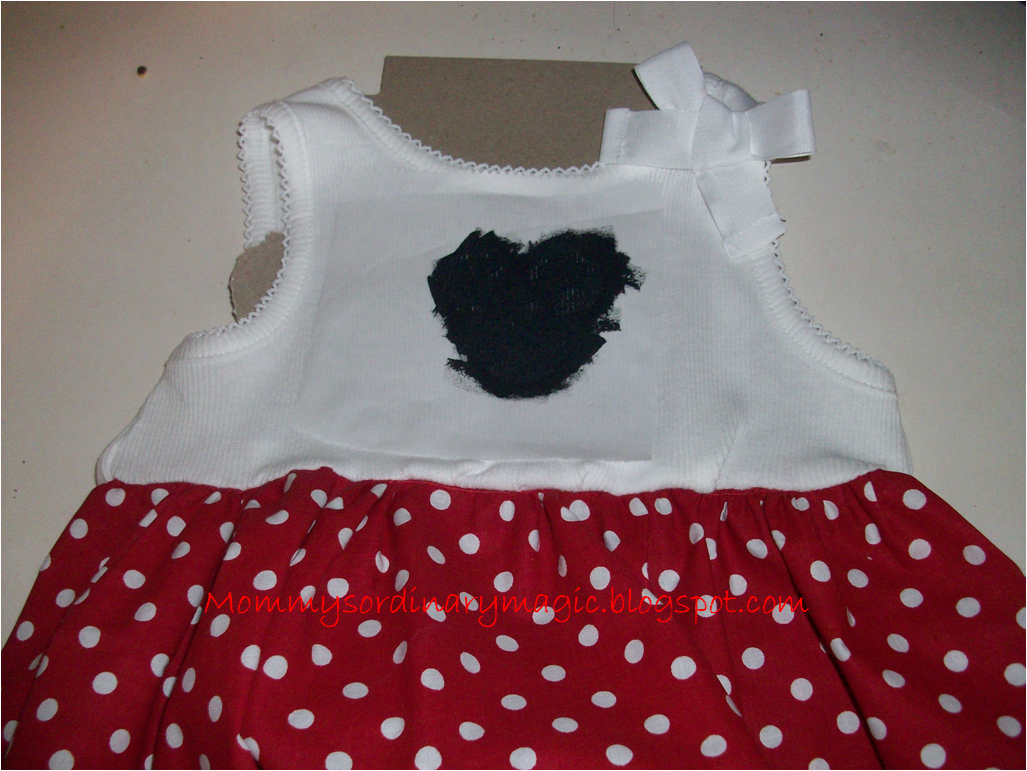
This is a semi-homemade outfit that I made out of a white t-shirt ($3 at Target) and a pair of black shorts ($2.44 at Wal-Mart). I also bought fabric at Hobby Lobby when it was on sale for $4 and used half a yard.

I cut a 8" x 36" piece of fabric for the bottome of my shirt. Oh yeah, I cut the bottom of the shirt off about an inch and a half below the armhole. Back to the red fabric...I ironed about 1/2 inch of one long side down for my hem and then sewed it. I sewed the two short ends together-wrong sides facing-to make a big loop. I then basted along the top and pulled my thread to get it to gather. Once that was done I attached it to the bottom of my shirt.

Let me try to walk you through this is case you are really bad at picturing in your head how to make things come out the right way....

I laid my shirt down, right side out. I turned my gathered red fabric 'inside out' so the wrong side was facing me. I then put it around the bottom of my shirt so the gathered end was against the bottom (now cut-off) end of my shirt. The hem of the red fabric was pointing toward the collar of the shirt. Still with me??? I pinned them together and carefully sewed.

Make sure you aren't so excited to be getting so much done and so well that you forget a step here. Make sure that the side seam of your red fabric meets up with the side seam of your shirt. :) Otherwise you will have a seam running down the front of your shirt. Thank goodness my mom was here and offered to rip the stitches out for me so I could do it again. Rookie mistake that I learned long ago and have no idea where my head was yesterday!

After that was in place and incredibly cute I decided to try something I had never done before. A freezer paper stencil. From some of the posts I have read about them, people seem to make these sound so difficult. I was scared for nothing.

I took a small piece of freezer paper and using a bottle of acrylic paint for the head and a quarter for the ears I traced a Mickey Mouse silhouette. I cut out my stencil from the freezer paper and with the waxy side down I ironed it to my shirt. I blotted some paint on there and easy peasy....not scary at all.

After the paint was dry I peeled the paper off and was so very happy :) Isn't that white bow the shirt came with just adorable?


I used the same concept of adding the red fabric to the shorts. Except the fabric was 18" x 4" for each leg hole.  I made a bow out of ribbon that I had leftover from our Minnie Mouse birthday party and hand sewed it to the shirt. i topped it with the ears I made her for the same party and she was so excited to try it on. The only problem I had was chasing her around the (messy) house to try and snap a picture! I can't wait for our dinner with Mickey and Minnie!


Tuesday, May 29, 2012

Winnie the Pooh T-shirt

My family is taking a vacation this year.

A very big vacation. A very special vacation.

Some people may think I'm crazy for taking a 2 year old and an infant to visit Mickey Mouse but we are all super excited!

And, we got a great deal when I booked back in March. Yep, March. So, I have LOTS of time to plan things and create fun stuff for our trip.

We'll be driving down at the end of August with my parents in tow. So, I will have plenty of posts in the coming weeks before our trip and even after with my tips, tricks and ideas for an awesome Disney vacation.

I completed my first real 'Disney Vacation' project last week. I want to make my daughter a lot of her clothes for the trip-while also stocking up on a bunch of Disney character garb at mom2mom sales-OMG I have a ton! I am not talking about making a princess dress though. That talented I'm not. My favorite character growing up was Winnie the Pooh. I was obsessed. So, I wanted to be sure along with Minnie and the princesses, Poohbear would be in her wardrobe for the week too.

I found this Disney shirt on Pinterest and it's from Honeybee Vintage.
I had a different idea in mind for a princess inspired piece so I took this idea and turned it into my own Winnie the Pooh creation.
I simply found a picture of Poohbear that was a side shot and traced it onto my paper. I went through my fabric scraps and found some yellow cotton fabric and red felt. I used ironed some heat n' bond to the back of each and then cut out each Pooh bear shape. After attaching it to the shirt I hand stitched around it with some yellow embroidery thread since I wasn't sure I would be able to do all the curves with my machine. I found a pack of honeybee buttons at Jo-Ann's and they were the final touch. My little girl loves the buttons and makes the zzzzzzzzzzzzzz sound while she plays with them :)

There you have a very cute and extremely inexpensive Disney shirt for a fun vacation memory. And, now I don't have to spend an arm and a leg at the park or the Disney store to get her something to wear!


Garanimals shirt from Walmart: $3.88
Honeybee buttons from Jo-Ann's: $1.99
(but I used a coupon too so they were cheaper!)
everything else I had on hand!


And, she loves it!

Sunday, May 20, 2012

Magnetic 'Princess Puzzle'

My daughter named this project all by herself. I had no idea what I would call it but she calls it her 'princess puzzle' and since I had nothing better, it stuck. Pardon the pun :)

I bought some princess magnets in the dollar spot at Target a while back. I thought they would make a fun prize for her for one thing or another. Then I thought "what 2 year old would have fun looking at something stuck to my fridge"? Yes, she has lots of magnets on my fridge and I am constantly kicking on of her alphabet magnets but enough is enough. I decided I did not want anything else for her to play with on my fridge.

And, the idea for this 'toy' came to be. I made her an activity set she loves and since it is magnets it is also something she can only play with when with someone else. An adult someone else, to supervise, so I get to have lots of fun with her and this one!

I started with the magnets and an old cookie sheet.
This is a really old cookie sheet. It was actually one I kept in my oven as a 'drip pan' which is why it is so black and forever tarnished. I hate when my stuff starts to look like this so I didn't use it anymore.

I was hoping to find some scrapbook paper with pictures or scenes on them that I could just cut out and around but I didn't. I bought some plain green, plain blue,  and a page of 'cloudy sky' paper. I also found a package of Disney chipboard pieces that included a castle, trees and flowers among a few other things (I didn't use the other pieces so I don't remember). Plus, it actually matched some of the magnets perfectly...it had the same coach and castle so I knew it would go together well! I had a 50% scratch off coupon so that only cost me $2.50.

A bit of white spray paint. lots of cutting, a bunch of two sided tape and my cookie sheet looked vastly different.
Now add the princess magnets and she has a fun new plaything! I just have to remind her every so often that only the princesses and the carriage move so if you do make this for a smaller child, using the chipboard might not be the way to go unless you are always going to be there to make sure they don't rip pieces off :)


Saturday, May 12, 2012

Personalized Clock

I made this project as a gift for a bridal shower recently. I found the tutorial long ago and finally decided to make it.

With the hubby's help of course...I don't touch the power tools :)

My friend, who is the bride and the recipient of this gift loved it. In fact everyone at the shower was amazed that I made it myself. The mother of the bride was almost in tears over how much she loved this gift. I even had a little old lady (friend of the bride's family!) that wouldn't leave until I gave her my contact info so I could make one with all of her grandkids on it.

The tutorial originally came from Rosy Red Buttons.  I will give you my .02 worth on this project too.

1. Sam's Club does not offer a 12x12 photo size. They don't offer any 'even' (8x8, 12x12) prints that I could see. I had to order it as a 12 x16 and cut four inches off. This was ok since my photo was 'artsy' anyways and it didn't matter if I cut it apart. But, for a family photo or something with subjects all the way to the edges you may have to work on it. I really wish I had photoshop!

2. Sam's club does have the cheapest prices. My poster cost $3.14 after taxes and it was ready in about an hour. The next lowest price was $6.99 at my Walgreen's and the prices went up from there. I looked into having it done as a engineer blueprint at Staples but they start at $9.99. I wanted to keep this cheap!

3. PicMonkey is a great site. I never really got into Piknik so I was not too sad to see them go. Maybe I just didn't try enough. I didn't really 'get' it. But, I tried PicMonkey and it was so easy and I loved how the picture looked.

4. I bought my clock set at Hobby Lobby for $4.99 and bought an extra set of longer clock hands that were black for $3.49. The set comes with short gold arms and they didn't go with the image in my head.

5. I bought my numbers at Jo-Ann's for $2.99 in the Scrapbook section. Hobby Lobby has a much better selection. And, better prices. I originally bought some there but I didn't like the way they looked once I was done with the clock. Since Jo-Ann's is closer and the shower was two days away I didn't have much choice. They still looked nice but they were flat and I wanted them to 'pop' off the face a bit.

All in all once my husband cut the board for me it went really fast from there. I was so happy with how it turned out and so was everyone who saw it. I LOVE this idea and am so glad I found the tutorial!

My finished product:

This picture is one of their engagement shots and sums up my friend's personality well. She has had this shot as her profile picture on FB for months so she was excited to see it as the clock I think too!

Monday, May 7, 2012

Tangled hairbow holder

My niece turned one this past weekend and surprisingly I did NOT make her entire gift :)

When my daughter celebrated her Minnie Mouse birthday this January people took the theme and 'ran with it'. And, we now own nearly EVERY 'Minnie's Bowtique' toy on the market. Most of her presents matched the party for some reason. I decided I wouldn't do that for my niece since I figured everyone would probably be choosing 'Tangled' toys to match her theme.

Thankfully (in my opinion) she got a wide variety of items. I went against my gut and decided that the one piece of her gift that I was going to make would have a Tangled theme to it.

I simply bought a mini unfinished birdhouse at Michael's for $1; the one I chose had a tin roof to it. I also bought three wooden spools for .79 each and a round wooden plaque for .59.

A little glue, some paint, yards of yarn and some handmade bows (also by me) and she has a pretty cute hairbow holder if I do say so myself :) My sister-in-law has been asking for bows for my niece more lately so I thought this would be the perfect way to gift a bunch of them to the little cutie.