I knew I wanted to make something like this for the big girl bedroom long before we even started putting the room together.
I read a lot of online tutorials I found while doing a Google search and then used them all to make my own version.
I decided to write up how I made mine in the hopes of helping someone someday (added to the fact that I never plan on making one of these again unless I am being paid big time!) and I even took some pictures while I was working to help explain things :)
This project took me a long time to do...well at least what I consider a long time! I think because it is so much tedious work that it was harder for me to 'get into' it and keep at it. Once I made a bunch of progress on it and it started to take real shape I was hooked though and got it done in record time. Record nap time of course since this was a no-go to bring out while the big girl herself was hanging about.
I am so happy with how it looks in her room and love when she points up and says 'momma do's it' :) She knows at least that I put it there!
All in all I probably spent between $5 and $8 on this project. I had to buy two new hole punches but I got them at 40% off at Jo-ann's so they cost me $12 total but I can always use those again so I don't take the total amount into consideration of my final cost. That's just how I think at least :)
What I used:
Cardstock-I used 3 sheets EACH of three different shades of pink. 9 sheets total of 12x12 cardstock. I got it while it was on 5/$1 sale or something like that.
Two hole punches-One 2 inch flower and one 1 inch flower from Fiskars.
Bunch of old pennies-I used 20 total.
Glue dots-found with the scrapbooking supplies but I already had mine.
Fishing Line-surprising how my family has an abundance of this on hand at any time ;)
Two embroidery hoops-I used an 8 inch and 4 inch. I opted to buy the plastic ones that were already pink since they were each only $1 more than the unpainted wooden ones I would have had to buy spraypaint for anyways.
Coordinating Ribbon-I used a 5/8 inch pink satin that was 2/$1 and used 1 and one half rolls.
regular old sewing needle
ribbon or wire or something else for a hanger
How I did it:
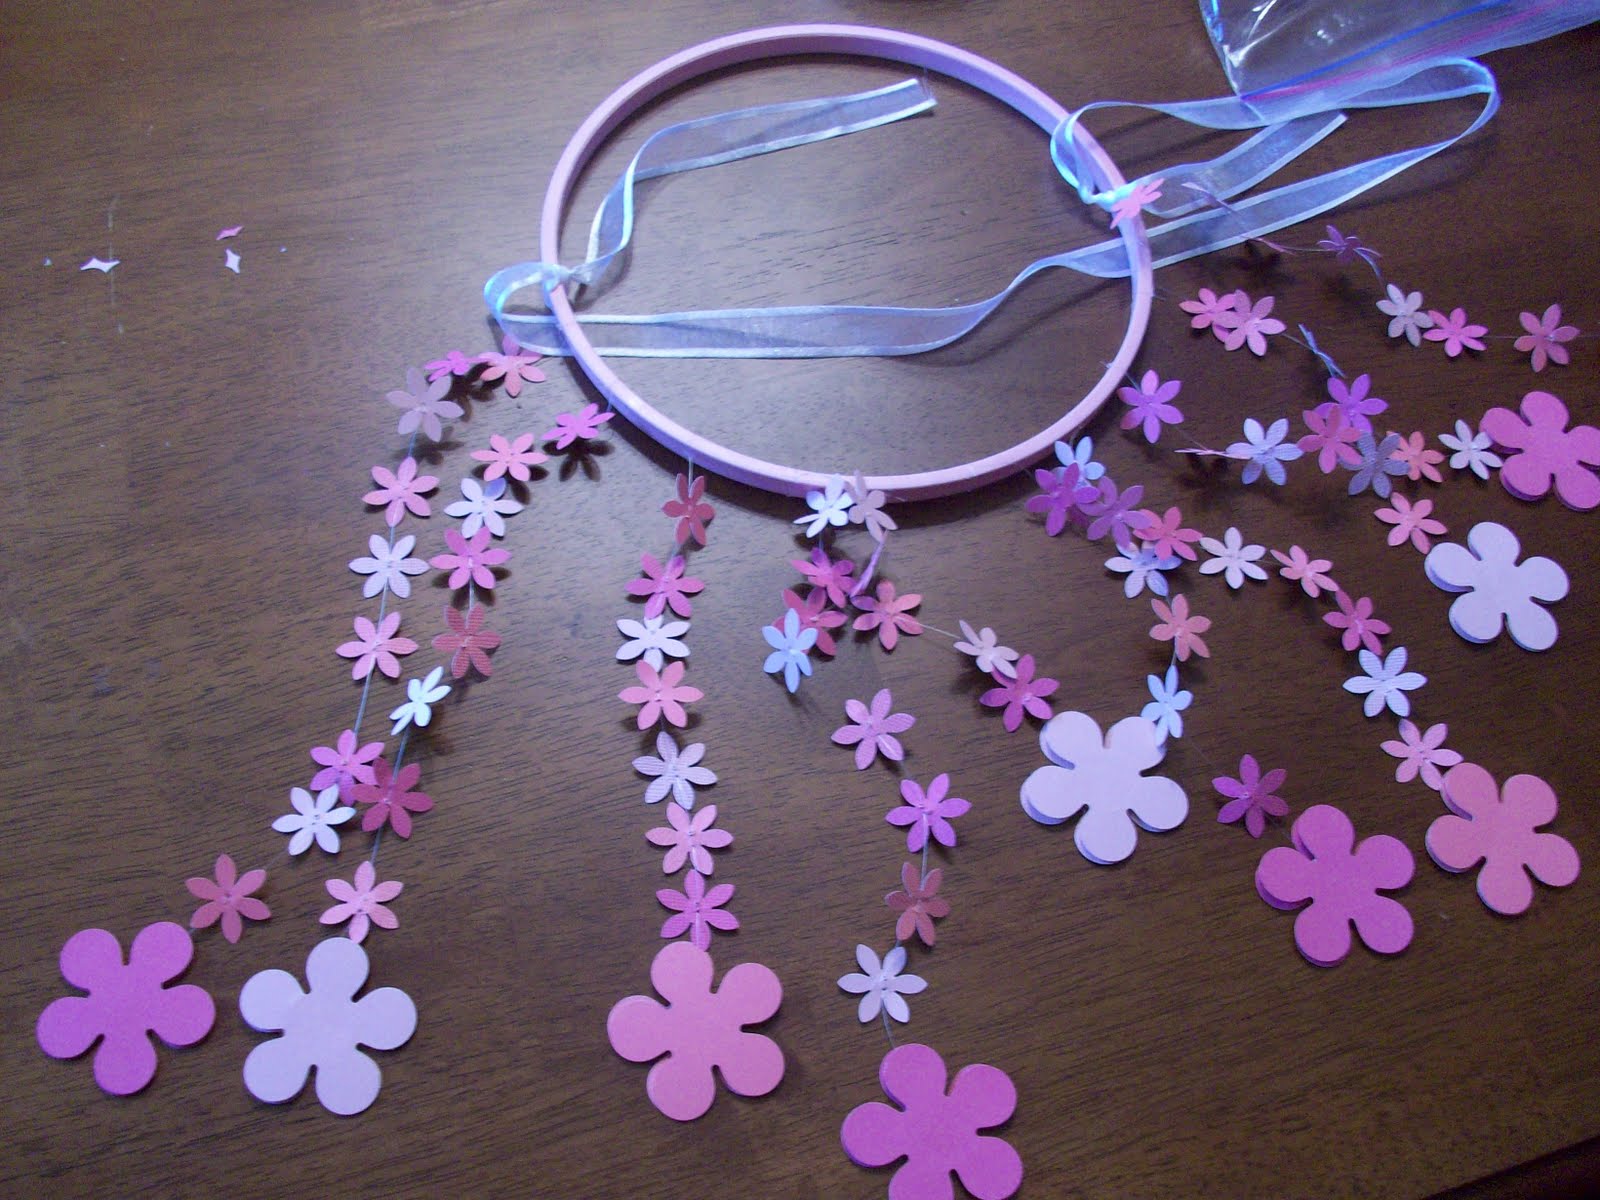
I started by removing the inner hoop from the outer embroidery hoop. I only used the inner one (the one without the hardware on it). The bigger one is where I would attach my flower strands so that is the one I worked with first. I had some white transparent ribbon in my stash and used that for my hanger. I simply cut four even pieces of ribbon and spaced them evenly around the hoop and tied them in a double knot. Then I took the other ends and tied them all together in a knot and had my hanger.
My large flowers are what I would use to anchor the strands of flowers and since I decided to do 20 strands I would need 40 large flowers to be sure to make them double sided. I punched those out first; I was planning on doing a pattern with the large flowers (to be sure that two of the same didn't end up next to each other) so if you want to do that figure out how many out of the 20 strands will be each color so you can punch exactly the right amount. I didn't do this and had a bunch of flowers left over but that was ok for me.
After I had them punched out I worked on attaching the fishing wire. My cardstock was textured on one side and I decided I didn't want that side to show so that became the inside part of my flowers. For each strand of flowers I would need two matching big flower punches and one penny. I put a glue dot on the inside side of each flower. I pressed one penny on to one glue dot and the end of the fishing line into the other glue dot.
Then I took the flower piece with the fishing line and pressed it firmly onto the side with the penny.
I made all twenty of these in the beginning instead of making one strand at a time. I didn't pre-cut the fishing line either. I cut it once the large flowers were attached to the other end, this made it easier to handle and not so flimsy and fly-away. I eyeballed how long/short I would cut it and then figured if it was too long I could cut it once it came time to attach it to the hoop. I wanted them all to be varying lenghts but didn't want to measure them out and be too precise about it either. Once the large flowers were attached I laid them on my workspace in the order(pattern) that I would be hanging them to make it easier on myself.

Now, I had to punch a million smaller flowers. It didn't take as long as it sounds especially since, yet again I didn't count or punch the exact amount I needed but rather did a bunch and then did more as I needed them. I kept them in three separate color piles to make it easier to figure out which ones to grab. Then I worked one strand at a time. I thread the loose end of the fishing line through my needle. I chose the thinnest needle with the largest eye that I could find. I then poked it up through the back side of my small flower and out the front and then back down to the backside. I slid them into place as far from the top as I could. I knew I would need a lot of line to be able to tie and then could re-arrange them once they were hanging in place. I didn't do a pattern with the small flowers but tried to be sure not to add two of the same color in a row. That is as far as I went with organizing this part. I wanted each strand to be completely different from the next. This is how each strand looked. Of course how many flowers I put on it depended on how long the fishing line was.

After each strand had the small flowers threaded on it I tied it to my hoop right away. In the beginning I kept it flat on my work table but as more got added and it had even weight on it I just hung it off the back of one of my kitchen chairs. This made it easier on me to see the length I wanted and to make sure the lines didn't tangle too much. I put them on in the order of the pattern which is why having them laid out on the table all ready for me was so helpful. I did a double knot on each one, and pulled really hard sometime using my teeth to make sure the fishing line was secure and then cut anything that stuck out of the end of the knot. This is what I had going:
Once all 20 strands were attached I moved them as I wanted (and could depending on the strenth of my knot) into place. I was now ready to work on my inner hoop.
I cut my ribbon to 14 inches and now wish it was much longer. Oh, well. I cut it out a little at a time since I wouldn't know how much I would need to cover my entire small hoop. Once it was cut I would fold the ribbon in half and fold the loop end over my hoop. Then I would pull the two free ends through the loop and pull tight. This is what it started to look like:
I have NO idea how many ribbons I used since I wasn't about to count them. Once the entire hoop was covered in ribbon I made a similar hanger with fishing wire as I made for the big hoop with ribbon. I attached four pieces of fishing line-evenly spaced apart (think 12,3,6,9 on a clock) and instead of tying them together at the top I attached them to the bigger hoop with about 6 inches of fishing wire left between the knot of the large hoop and the one on the small hoop.
Now, you should be done! I hung it in her room right away as there was already a hook in the ceiling and she loves it. Even my husband was impressed when he got home from work! I do wish the ribbon was longer but I am not going to re-do it all and I know for sure it will be years and years before she is able to reach it by standing on her bed :)